Landscaping
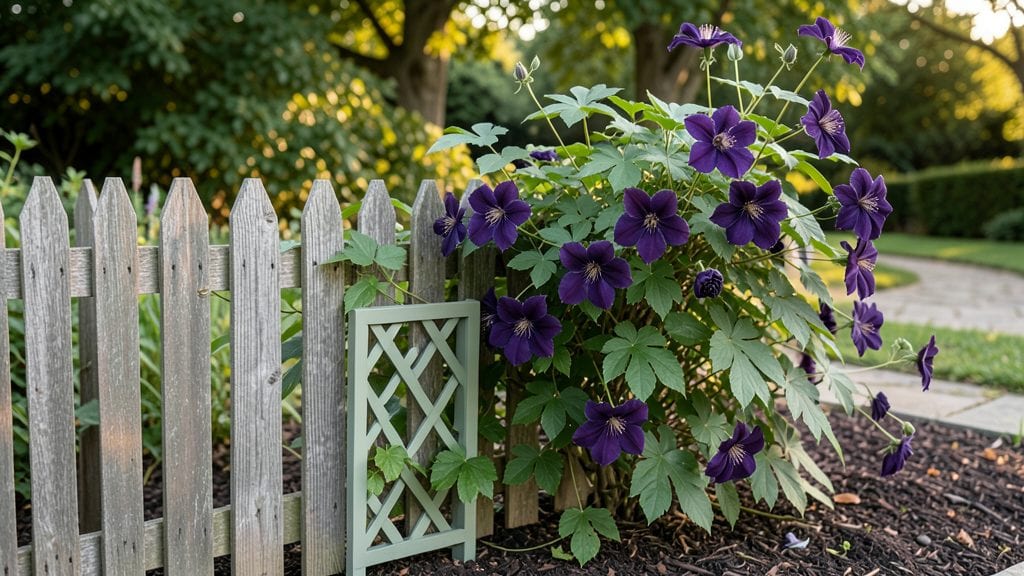
My garden fence design transformed my backyard from a windswept eyesore into a cozy, private retreat—without looking like a barrier at all. The trick? Choosing materials and styles that echo the natural lines of my landscape, so it feels like an extension of the garden rather than a wall.
I swapped stark wood panels for lattice that lets vines climb, and used vertical slats that catch morning light just like the trees do.
You don’t need to be a carpenter to pull this off—most privacy screens use simple materials like cedar planks, metal pickets, or even woven bamboo. The key is matching the height to your needs: 5-6 feet for full privacy, but 3-4 feet if you just want to block nosy neighbors.
My favorite? A split-rail design that lets you peek through while still keeping things intimate. It’s the kind of fence that makes you want to linger outside instead of hiding behind it.
Imagine stepping into your yard and seeing lush greenery framed by clean lines, rather than a generic fence that clashes with everything around it. With the right design, your fence becomes a feature—supporting climbing roses, casting dappled shade, or even doubling as a trellis for seasonal flowers.
The best part? It’ll last for years with minimal upkeep, and you’ll finally have that neighbor-jealousy-worthy backyard you’ve been dreaming of.
Whether you’ve got a sprawling lot or a tight urban patio, these ideas adapt easily—just swap materials for what suits your climate (vinyl for humidity, metal for durability). Let’s make your fence work as hard as the rest of your garden does, not against it.
📚 In This Guide
- What you need
- Instructions
- Tips and common mistakes
- Wrapping up and next steps
What you need
- ● Fence panels: 6–8 ft tall (adjust based on privacy needs), made of wood (cedar, redwood, or pressure-treated pine), vinyl, or composite. Quantity: Calculate based on your fence length (e.g., 100 ft of fence × 8 ft panels = ~13 panels).
- ● Posts: 4×4 pressure-treated lumber (6 ft long for ground-to-panel height). Quantity: 1 post every 6–8 ft (e.g., 17 posts for 100 ft fence).
- ● Concrete: 60 lb bags (for setting posts). Quantity: 1 bag per post (check soil stability—rocky ground may need more).
- ● Hardware: Galvanized screws or nails (2.5–3 inches long for panels, 3.5 inches for posts).
- ○ Post caps (optional but recommended for a polished look).
- ● Hinges and latch (if adding gates).
- ○ Landscape fabric: Weed barrier (optional but highly recommended under panels).
- ● Measuring tape, speed square, and chalk line.
- ● Post hole digger (manual or auger) or shovel.
- ● Level (4 ft) for straight, even panels.
- ● Circular saw or miter saw (for cutting panels/posts).
- ● Drill/driver (for screws) and impact driver (for stubborn nails).
- ● Wheelbarrow (for mixing concrete).
- ● Safety gear: gloves, goggles, and ear protection.
- ● Check local codes: Verify height restrictions, permits, or HOA rules before starting! 📜
- ● Mark your layout: Use stakes and string to outline the fence line—trust me, this saves headaches later. 🎯
- ● Prep the ground: Clear grass, rocks, and debris from the fence line. A flat base = a sturdy fence! 🌡️
- ● Weather watch: Aim to install posts on a dry day (concrete needs 48 hours to cure). ☔➡️☀️
- ○ Optional upgrades: Stain/sealant (for wood panels—apply after installation).
- ● Landscape lighting (solar-powered for a magical nighttime glow).
- ● Climbing plants (e.g., ivy or roses) for a living privacy screen. 🌿
Instructions for designing a natural privacy screen fence
Creating a fence that feels like part of the garden—not an intrusion—starts with smart planning and the right materials.
Measure and Mark Your Space
Begin by measuring the area where your fence will go. Use a tape measure to record the length and note any obstacles like trees, utility lines, or uneven terrain. Mark the perimeter with wooden stakes and string—this keeps your design straight and visible as you work. I always add an extra 6 inches beyond the marked line for overhang or future adjustments.
Check for slope variations with a level. If your yard isn’t perfectly flat, you’ll need to adjust post depth or use stepped designs to maintain a clean look. Sketch a rough layout on paper first—this helps visualize how plants or lattice will integrate with the fence structure.
Choose Materials That Complement Your Garden
Select materials that harmonize with your existing landscape. For a natural look, consider cedar or redwood for wood fences—they resist rot and blend with greenery. If you prefer a more organic feel, lattice panels or woven willow allow vines to climb and create a living screen. Avoid stark metal or vinyl unless you’re going for a modern contrast.
Think about height too. A 4- to 6-foot fence offers privacy without blocking sunlight completely. For taller screens, layer materials—like a lower wooden section with climbing roses trained upward. Always check local regulations before building; some areas limit fence height or require permits.
Install Posts and Framework
Dig post holes 12 inches deep and 6 inches wider than the post diameter for stability. Use a post hole digger or auger to avoid compacting soil. Set posts in concrete mix (follow bag instructions) to secure them permanently. For a softer look, bury posts in gravel instead—this allows roots to grow closer if you later add plants.
Attach horizontal rails or lattice panels to the posts, spacing them 12–18 inches apart for structural support. If using lattice, leave gaps for vines or tall grasses to weave through. Pre-drill holes to prevent wood splitting, and use outdoor-grade screws or hidden clips for a seamless finish.
Add Greenery for a Living Screen
Incorporate plants that thrive in your climate. Evergreen shrubs like arborvitae or boxwood create year-round privacy, while flowering vines (like clematis or jasmine) add seasonal interest. For a wild, natural look, plant fast-growing grasses or bamboo on one side of the fence—just monitor their spread to avoid overcrowding.
Train climbers by tying stems to the fence with soft twine or spiral clips. Space plants 2–3 feet apart along the base for even coverage. Mulch with 2–3 inches of shredded bark to retain moisture and suppress weeds. Water deeply after planting to help roots establish.
Finish with Details That Blend In
Soft edges make all the difference. Use rounded post caps or natural stone accents to break up hard lines. Paint or stain wood in earthy tones (like sage green or warm gray) to match your garden palette. For a rustic touch, leave cedar or cypress untreated—its silver-gray hue ages beautifully.
Add lighting with solar-powered path lights or string lights woven through lattice. This not only enhances evening ambiance but also highlights the fence’s natural integration. Step back and adjust as needed—your goal is a screen that feels intentional, not imposed.
Tips & tricks for designing a natural privacy screen fence
These practical strategies will help you create a seamless privacy screen that enhances your garden rather than clashes with it.
Design for Natural Flow: In Step 1, when you're marking your space, consider how the fence will interact with existing garden elements. For example, if you have a curved garden bed, follow its natural lines rather than forcing a straight fence. This creates a more organic transition between your garden and the fence. Also, leave room for seasonal changes—plants will grow, and you want space for them to flourish without feeling cramped.
Material Selection Matters: When choosing materials in Step 2, think about both aesthetics and maintenance. Cedar and redwood are excellent choices because they resist rot and blend beautifully with greenery, but don't overlook the texture of the wood. Rough-sawn cedar offers a rustic look, while smooth redwood provides a cleaner appearance. For lattice panels, opt for wider gaps if you plan to grow vines—this allows better air circulation and faster growth.
Post Installation Precision: In Step 3, when digging post holes, take extra care with the depth and width specifications. The 12-inch depth ensures stability, but if your soil is particularly loose or sandy, you might want to add an extra 2 inches of depth. For the 6-inch wider diameter, use a level to ensure the hole is perfectly round—this prevents posts from tilting as they're set. If you're using gravel instead of concrete, mix in some coarse sand to help stabilize the posts while still allowing roots to grow closer.
Greenery Integration Tips: For Step 4, when adding plants, consider layering different types of greenery for year-round interest. Place evergreens like arborvitae at the base for foundational coverage, then add flowering vines that will climb and fill in gaps during growing seasons. If you're using bamboo, choose clumping varieties to prevent aggressive spreading. When training climbers, start tying them to the fence when they're about 2 feet tall—this gives them support as they grow without overwhelming the structure.
Pro Tips for Garden Fence Design
- These practical strategies will help you create a seamless privacy screen that enhances your garden rather than clashes with it.
- Design for Natural Flow: In Step 1, when you're marking your space, consider how the fence will interact with existing garden elements.
- Material Selection Matters: When choosing materials in Step 2, think about both aesthetics and maintenance.
Frequently asked questions
Got questions about designing a garden fence that balances privacy with natural beauty? Here are some common concerns—and expert answers—to help you plan with confidence!
What’s the best time of year to install a garden fence?
The ideal time is early spring or fall when the ground is workable but not frozen. Avoid winter (harsh conditions) or peak summer (extreme heat). If you’re planting climbers like ivy or roses, install in late winter or early spring to align with their growing season.
Can I install a fence myself, or should I hire a pro?
DIY is possible for simple designs (like wooden pickets or vinyl panels) if you have basic tools and patience. For privacy screens with lattice, trellises, or heavy materials like cedar or composite, hiring a pro ensures structural integrity and code compliance. Pro tip: Check local permits for fences over 6 feet tall!
How do I choose a fence that blends with my landscaping?
Match your fence to your garden’s style and scale:
- Natural look: Wood (cedar, redwood) or woven willow with climbing plants.
- Modern vibe: Sleek metal or black vinyl with clean lines.
- Wildlife-friendly: Open lattice or bamboo for airflow and habitat.
Bonus: Color-coordinate with your home’s exterior or garden accents!
What if my fence blocks sunlight or airflow for plants?
Opt for semi-private designs like:
- Slatted wood or composite panels (allows light through).
- Trellises with climbing vines (creates shade + beauty).
- Perforated metal or bamboo screens (aesthetic + functional).
For dense privacy, plant sun-loving shrubs (e.g., holly or boxwood) along the base to soften the effect.
Are there affordable alternatives to traditional wood fences?
Consider:
- Vinyl or composite: Low-maintenance, durable, and budget-friendly long-term.
- Bamboo screens: Fast-growing, eco-friendly, and cost-effective.
- Living walls: Use stacked planters or pallets filled with drought-resistant plants.
- Salvaged materials: Reclaimed wood or bricks add character at a lower cost.
Pro tip: DIY kits (like pre-assembled panels) can cut labor costs by 30–50%!
How do I troubleshoot fence sagging or gaps over time?
Sagging usually means post settling or weak supports. Fix it by:
For gaps, adjust tension (for wire or mesh) or add filler panels. Regularly inspect after storms or seasonal shifts!
Wrapping up and next steps
Designing a garden fence that balances privacy and natural beauty is all about creativity and intentionality. Whether you opt for lush greenery, sleek wood, or modern metal, the right materials and layout can transform your outdoor space into a serene retreat. 🌿
Now that you’re inspired, take the next step—sketch your vision, gather materials, and start building! Your dream garden fence is closer than you think, and the satisfaction of a well-designed outdoor space will make every effort worthwhile.