How To
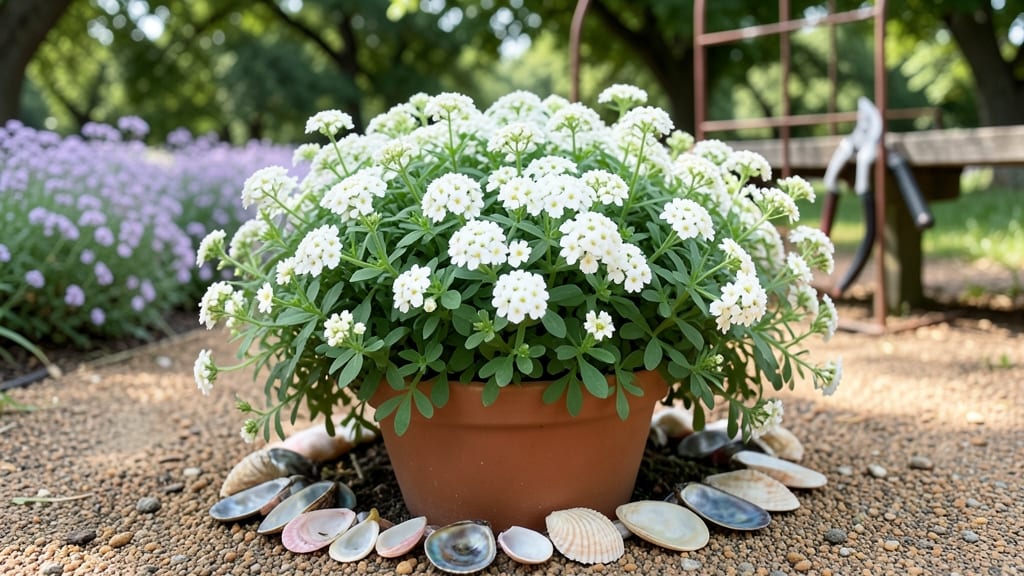
Learn how to use seashells in the garden to transform your space into a shimmering coastal haven where every breeze reveals hidden glints of light. years without fading. The best part? They’re free if you live near the shore, or just a beach trip away for everyone else.
You don’t need fancy tools or special skills—just a bucket, some gloves, and an eye for arrangement. Crush larger shells for pathways or mulch, or leave them whole for decorative borders and wind chimes.
A single layer along garden edges adds texture and movement, while grouping them in clusters creates natural-looking art. The key is balancing sizes and colors for a cohesive look that feels intentional, not random.
What you’ll end up with is a garden that tells a story—each shell a tiny piece of the ocean’s history, now part of your outdoor space. The contrast of smooth curves against foliage makes plants pop, and the reflective surfaces catch sunlight in ways gravel or rocks never could.
Plus, they’re lightweight, so you can rearrange them whenever inspiration strikes.
Works in coastal gardens, cottage-style beds, or even as a whimsical accent in modern designs. Whether you’re lining a walkway or crafting a mobile, seashells bring a touch of the sea that never washes away—just wait until you see how they glow at dusk.
📚 In This Guide
- What you need
- Instructions
- Tips and common mistakes
- Wrapping up and next steps
What you need
- ● Seashells – Collect or purchase a variety of sizes (small pebbles to large shells). Aim for at least 5–10 gallons (or ~20–30 lbs) for a small garden bed or pathway. Clean and dry them thoroughly before use!
- ● Gloves – A pair of nitrile or rubber gloves to protect your hands from sharp edges and salt residue.
- ● Garden twine or netting – For securing shells in windy areas (e.g., 10–20 ft of twine or a small roll of netting).
- ● Garden shears or scissors – For trimming twine or netting to size.
- ● Garden hose with spray nozzle – To rinse shells if they’re overly salty or sandy.
- ● Mortar and pestle – For crushing shells into fine mulch (great for soil aeration!).
- ● Sand or gravel – To mix with shells for pathways or borders (1–2 bags, depending on project size).
- ● Epoxy or waterproof sealant – To preserve shells for long-term outdoor use (e.g., 1 small bottle).
- ● Decorative stakes or markers – For outlining shell borders or pathways.
- ● Solar-powered lights – To highlight shell features at night (e.g., 2–4 lights).
- ● Child-safe shells – If you have pets or kids, skip sharp-edged shells or use smooth, rounded varieties.
Step-by-Step instructions for using seashells in the garden
Transform your garden into a coastal retreat with these timeless, functional uses for seashells.
Clean and Sterilize Your Seashell Collection
Start by gathering shells from a clean beach—avoid those with barnacles or sharp edges that could harm plants or pets. Rinse each shell thoroughly under running water to remove sand, salt, and debris. Place them in a 50/50 mix of white vinegar and water for 10 minutes to dissolve any lingering salt residue, which can damage soil over time. This step is critical: salt buildup can stunt plant growth or create a harsh environment for beneficial microbes.
After soaking, scrub shells with a soft brush if needed, then rinse again until the water runs clear. Spread them on a clean towel to air-dry completely in direct sunlight for 24 hours. This sterilization process ensures your shells won’t introduce unwanted pathogens to your garden. I like to arrange them on a baking sheet for even drying—just avoid high heat, which can weaken some shell types over time.
Create a Natural Garden Pathway
For a classic coastal look, use shells to line walkways or define garden beds. Start by outlining your path with a garden hose or string to mark the edges. Lay shells in a single layer, slightly overlapping for a seamless effect. For a 4-foot pathway, you’ll need about 20-25 medium-sized shells per square foot—adjust based on shell size. Press them lightly into the soil to prevent shifting, but don’t bury them completely; exposed shells create that signature beachy charm.
Fill gaps between shells with coarse sand or small pebbles to stabilize the surface and reduce weeds. Water the area lightly after placement to help settle everything. This method works beautifully for both functional paths and decorative borders around flower beds. Just avoid using shells in high-traffic areas where they might become uneven or slippery when wet.
Build a Shell Mulch Ring Around Plants
Enhance plant health and aesthetics by creating a 3-inch-wide mulch ring of crushed shells around the base of your plants. Use a hammer or mallet to gently crush larger shells into pea-sized pieces—this prevents them from becoming a tripping hazard while still providing benefits. Sprinkle the crushed shells in a ring 2-3 inches away from the plant stem, leaving the center free of debris to avoid rot.
This technique serves two purposes: crushed shells slowly release calcium and magnesium into the soil, benefiting acid-loving plants like azaleas and hydrangeas, while also deterring slugs and snails (they dislike the sharp edges). For a single mature shrub, about 1 cup of crushed shells is plenty. Replenish the ring every 6 months to maintain its effectiveness and appearance.
Design a Shell Water Feature
Add a whimsical touch to your garden with a simple shell fountain. Choose a variety of shells in different sizes and shapes, then arrange them in a low, shallow basin (like a wide, flat dish or a repurposed plant saucer). Place the largest, flattest shells at the bottom to create a stable base, then stack smaller shells around the edges to form a slight upward slope toward the center.
Fill the center with water to a depth of 1 inch, then use a small pump (or a battery-operated fountain) to gently circulate the water over the shells. The sound of water trickling over the shells adds a soothing coastal ambiance. For a small feature, 10-15 shells of varying sizes work well. Place it in partial shade to prevent algae growth and enjoy the tranquil effect all season long.
Preserve Shells for Long-Term Garden Decor
To keep shells looking fresh for decades, seal them with a natural, plant-safe finish. Mix equal parts clear acrylic sealer and mineral oil in a small container, then brush a thin layer over cleaned, dry shells. This protects them from moisture damage and prevents staining while allowing them to retain their natural beauty. Let the sealer cure for 2 hours before using the shells in your garden.
Store unused shells in a dry, shaded area (like a garage or shed) to prevent cracking from temperature fluctuations. If shells develop moss or algae over time, scrub them gently with a mild soap solution and rinse thoroughly. With proper care, your shell collection can become a cherished garden feature that evolves with your landscape—adding character year after year.
Tips & tricks for perfect coastal garden design with seashells
Transforming your garden with seashells isn't just about aesthetics—it's about creating a functional, long-lasting coastal retreat. Here are my go-to tips to ensure your shell projects stand the test of time.
Sterilization is Non-Negotiable: In Step 1, that 10-minute vinegar soak isn't just about removing salt—it's your first line of defense against soil pathogens. I've seen shells collected from beaches with lingering salt crystals create a harsh growing environment. After soaking, I like to give shells a final rinse with a spray bottle to ensure no vinegar residue remains, which could also affect plant health. The 24-hour drying period in direct sunlight is crucial too—it kills any remaining microbes while preventing mold growth during storage.
Pathway Placement Matters: When creating your 4-foot pathway in Step 2, consider both function and safety. For high-traffic areas, I recommend using larger, flatter shells that create a more stable surface. The overlapping technique mentioned works wonders for visual continuity, but be mindful of shell sizes—mixing too many different shapes can create uneven walking surfaces. For extra stability, I sometimes add a thin layer of landscape fabric under the shells before pressing them into place, especially in areas prone to erosion.
Crushing Technique for Mulch: The pea-sized pieces mentioned in Step 3 are perfect for mulch rings, but achieving that consistency takes practice. I use a hammer wrapped in a thick towel to avoid cracking shells completely. For a more uniform texture, I crush shells in batches on a concrete surface—it's easier to control the size and prevents creating sharp edges that could harm plant roots. Remember, you only need about 1 cup for a mature shrub, so don't overdo it—too much crushed shell can alter soil pH over time.
Water Feature Stability: For your shell fountain in Step 4, stability is key. I always arrange the largest shells first, creating a pyramid-like base before adding smaller shells around the edges. This prevents the structure from toppling when you add water. For the 1-inch water depth, I use a ruler to ensure even distribution—uneven water levels can cause some shells to float or become unstable. Place your fountain in partial shade as mentioned, but avoid complete shade which can lead to algae buildup on the shells over time.
Pro Tips for Use Seashells In The Garden
- Transforming your garden with seashells isn't just about aesthetics—it's about creating a functional, long-lasting co...
- Sterilization is Non-Negotiable: In Step 1, that 10-minute vinegar soak isn't just about removing salt—it's your firs...
- Pathway Placement Matters: When creating your 4-foot pathway in Step 2, consider both function and safety. For high-t...
Frequently asked questions
Got questions about using seashells in your garden?
Here’s what you need to know to make the most of your coastal treasures—without the hassle.
Can I use any type of seashell in my garden?
Not all shells are created equal! Clean, unbroken shells (like scallops, clams, or abalone) work best for decor, mulch, or pathways. Avoid shells with sharp edges, barnacles, or signs of decay—these can harbor bacteria or pests. Rinse them thoroughly with freshwater and a mild bleach solution (1 part bleach to 10 parts water) to sanitize before use.
When is the best time to add seashells to my garden?
Seashells are versatile—you can use them year-round! For pathways or borders, lay them down in dry weather to prevent sinking into mud. If using shells as mulch or in planters, add them in spring or early summer to let them settle before heavy rain. Pro tip: Freeze them overnight first to kill any lingering organisms!
Will seashells harm my plants?
Nope! Seashells are plant-safe and even boost soil health over time. Crushed shells add calcium and magnesium, which benefits acid-loving plants like blueberries or hydrangeas. Just avoid piling them directly around plant stems (they can trap moisture and cause rot). For delicate flowers, use whole shells as decorative accents instead.
Are there cheaper alternatives to seashells for garden projects?
If shells are hard to find or pricey, try:
- Crushed oyster shells (from seafood markets)
- Pebbles or river rocks (for pathways)
- Broken terracotta pots (for mulch texture)
- Recycled glass or ceramic shards (for color)
Why do my seashells keep disappearing or getting buried?
Shells can vanish due to erosion, pets, or wildlife! To keep them in place:
- Secure pathways with landscape fabric underneath.
- Use larger shells or heavier rocks as anchors.
- Avoid placing them in high-traffic areas where kids/pets might dig.
- For planters, mix shells with gravel or sand to prevent sinking.
Wrapping up and next steps
From natural mulch to decorative accents, seashells bring a touch of coastal charm to your garden while offering practical benefits.
Whether you’re enhancing soil health, creating pathways, or adding whimsical decor, these versatile treasures are a sustainable and stylish choice. Start small—grab a handful of shells from your next beach trip and let your creativity flow!
Ready to transform your garden? Pick one idea from this guide and try it out today! 🌊✨