Container Gardens
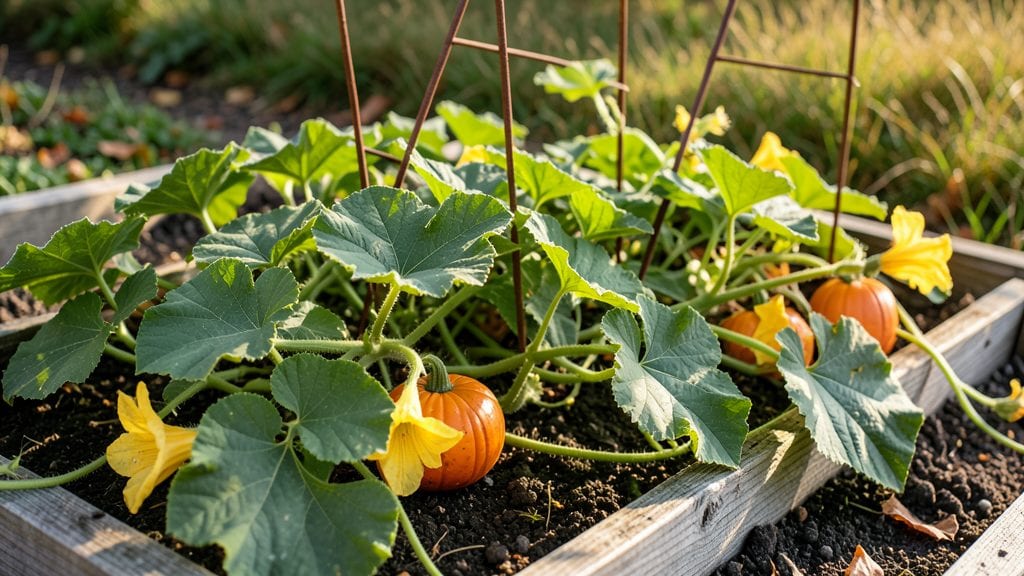
Discover the magic of a container garden pumpkin—it’s not only doable but a small-space revolution. 🌱 I thought I'd never grow pumpkins until I tried this method, and now I harvest mini pumpkins every summer from my balcony.
The secret lies in choosing the right varieties and containers, which makes all the difference.
You'll need a 5-gallon container minimum for smaller varieties like 'Jack Be Little' or 'Minnesota Midget,' but larger ones can handle up to 15 gallons. Fabric grow bags or sturdy plastic bins work best—they drain well and give roots room to spread.
Fill with a mix of potting soil and compost, and you're ready to plant just two to three seeds per container.
With 6-8 hours of sunlight daily and consistent watering, your vines will climb and produce fruit within 90 days. The pumpkins stay small but sweet, perfect for carving or baking. Prune regularly to encourage more flowers, and watch your container turn into a productive little pumpkin patch.
This method works in apartments, patios, or even sunny windowsills—no yard required. The key is patience and the right setup. Let's get those seeds in the ground and start growing!
📚 In This Guide
- What you need
- Instructions
- Tips and common mistakes
- Wrapping up and next steps
What you need
- ● Container: A large, sturdy pot or fabric grow bag (at least 5 gallons per plant; 10+ gallons for bigger varieties like Sugar Pie or Jack Be Little). Ensure it has drainage holes!
- ● High-quality potting mix: A well-draining, nutrient-rich blend (avoid garden soil—it compacts!). Look for container-specific mixes with added compost or coconut coir.
- ● Pumpkin seeds: Choose container-friendly varieties like Bush Delicata, Waltham Butternut, or Miniature Pumpkins. Start with 2–3 seeds per container (thin to the strongest seedling).
- ● Fertilizer: Balanced liquid fertilizer (e.g., 10-10-10 or 5-5-5) for early growth.
- ● Organic compost or worm castings (mix into soil at planting).
- ● Phosphorus-rich fertilizer (e.g., bone meal) at flowering to boost fruit development.
- ● Support system: A trellis, cage, or sturdy stakes (for vining varieties) to save space and prevent sprawling.
- ● Mulch: Straw or shredded leaves to retain moisture and regulate soil temperature.
- ● Hand trowel or small shovel for planting.
- ● Pruners (sterilized) for trimming vines or dead leaves.
- ● Watering can or hose with a gentle spray nozzle (pumpkins need consistent moisture!).
- ○ Gloves (optional but helpful for handling prickly vines).
- ● Sunlight: A location with 6–8+ hours of direct sunlight daily (south-facing windowsills or balconies work!).
- ● Warmth: Pumpkins thrive in 70–90°F soil temps. Start seeds indoors 2–3 weeks before last frost or wait until soil is warm.
- ● Patience: Container pumpkins take 90–120 days to mature—plan ahead!
- ● Self-watering container to reduce maintenance.
- ● Mycorrhizal fungi (adds to soil to improve root health).
- ● Row covers (protects young plants from pests).
- ● Pumpkin grow lights (if sunlight is limited).
Step-by-Step instructions for growing pumpkins in containers
Here’s how to grow a thriving mini pumpkin patch in limited space—no backyard needed.
🪴 Step 1: Choose the Right Containers and Prep the Soil
Select 5-gallon containers or larger with drainage holes—pumpkins need room for sprawling vines and deep roots. I use fabric grow bags because they prevent root circling and allow excess moisture to escape. Fill each container with a mix of 50% potting soil and 50% compost—this gives you the loose, fertile medium pumpkins crave.
Break up any clumps in the soil with your hands before adding it to the container. The goal is a fluffy texture that holds moisture but doesn’t compact. Press down lightly to eliminate air pockets, then water thoroughly until it’s evenly damp 1 inch below the surface. This ensures roots can establish quickly without drying out.
🌱 Step 2: Plant Seeds at the Right Depth and Spacing
Plant 2-3 seeds per container, burying them 1 inch deep—any deeper delays germination. Space seeds 6 inches apart in a triangle formation to maximize growth potential. I like to use a toothpick to make small holes for each seed, then drop them in gently. Cover with a thin layer of soil and pat it down lightly.
Place the container in a warm spot with 75-85°F soil temperature—a seedling heat mat helps if your space runs cooler. Keep the soil consistently moist by misting daily until sprouts appear, usually in 7-10 days. Once seedlings emerge, thin to the strongest one per container, snipping the others at the base with clean scissors.
☀️ Step 3: Provide Full Sun and Support for Vines
Pumpkins need 6-8 hours of direct sunlight daily, so place containers on a sunny patio, balcony, or deck. If you’re growing in partial shade, expect smaller fruits and slower growth. As vines develop, train them along a trellis or sturdy cage—this saves space and prevents sprawl. I use a 6-foot tall tomato cage for each plant, which gives vines plenty of room to climb.
Rotate containers a quarter turn every few days so plants grow evenly toward the light. Watch for vines reaching the top of the support—this is your cue to prune side shoots that aren’t producing flowers. Strong, upward growth means your pumpkin is focusing energy on fruit development rather than unnecessary foliage.
💧 Step 4: Water Deeply and Fertilize Weekly
Water containers when the top 2 inches of soil feel dry, soaking until water runs out the drainage holes. Pumpkins are thirsty plants, but soggy soil invites root rot. I water in the morning to let excess moisture evaporate during the day. Once flowers appear, increase watering to every other day—consistent moisture helps pollination and fruit set.
Feed plants with a balanced liquid fertilizer (10-10-10) every 2 weeks, starting when vines reach 3 feet long. Dilute the fertilizer to half-strength to avoid burning tender roots. You’ll see new leaves emerging within a week—that’s your signal everything is working. Stop fertilizing 4 weeks before harvest to let flavors concentrate.
⏰ Step 5: Harvest at Peak Ripeness
Check for mature pumpkins by pressing the rind near the stem—it should feel hard and papery. A fully ripe pumpkin will also have a deep orange color and a stem that’s dried and browned. Harvest by cutting the stem with a sharp knife, leaving a 1-inch stem attached to the fruit. Handle pumpkins gently to avoid bruising.
Cure harvested pumpkins by placing them in a warm, dry spot (80-85°F) for 7-10 days. This hardens the skin and concentrates sugars. Store in a cool, dark place for up to 3 months. You’ll know they’re ready when the skin is tough and the stem is fully dry—perfect for carving or baking!
Tips & tricks for perfect container-grown pumpkins
Here's what I've learned from growing pumpkins in containers—these tricks will help you avoid common pitfalls and maximize your harvest in limited space.
Soil Texture Matters: The 50/50 mix of potting soil and compost in Step 1 is non-negotiable for container growth. I've found that adding a handful of perlite to this mix improves drainage without sacrificing fertility—this prevents that dreaded root rot while maintaining moisture for thirsty pumpkin roots. The goal is soil that crumbles easily when squeezed, not clumps that resist your fingers.
Seedling Heat Secret: That 75-85°F soil temperature range in Step 2 is crucial, but achieving it can be tricky in cooler climates. I've had the most success using a simple seedling heat mat under my containers—it's more effective than just placing them near a sunny window. Pro tip: Check soil temperature with a thermometer rather than guessing. If it's below 70°F, germination can take 2-3 weeks instead of the usual 7-10 days.
Sunlight Strategy: The 6-8 hours of direct sunlight in Step 3 is your golden rule, but here's what nobody tells you: morning sun is more valuable than afternoon. Position your containers to catch those first rays—this gives plants a strong start before afternoon heat stress. If you're using a balcony, south-facing is ideal, but west-facing works too if you rotate containers daily to prevent one-sided growth.
Fertilizer Timing: Starting that 10-10-10 fertilizer when vines reach 3 feet in Step 4 is perfect, but here's my upgrade: I switch to a higher-phosphorus fertilizer (like 5-10-5) once flowers appear. This boosts fruit development without overfeeding foliage. And remember—always dilute to half-strength! I've ruined more plants than I care to admit by being overzealous with fertilizer.
Pro Tips for Container Garden Pumpkin
- Here's what I've learned from growing pumpkins in containers—these tricks will help you avoid common pitfalls and max...
- Soil Texture Matters: The 50/50 mix of potting soil and compost in Step 1 is non-negotiable for container growth. I'v...
- Seedling Heat Secret: That 75-85°F soil temperature range in Step 2 is crucial, but achieving it can be tricky in coo...
Frequently asked questions
Got questions about growing pumpkins in containers? You’re not alone!
Here are answers to the most common concerns—from timing to troubleshooting—to help you crush your compact pumpkin harvest.
What’s the best container size for growing pumpkins?
Opt for a 5-gallon minimum (like a large fabric pot or half whiskey barrel) for small varieties like Jack Be Little or Miniature White. Larger pumpkins (5+ lbs) need 10+ gallons—think Cinderella or Sugar Pie. Drill drainage holes to avoid root rot!
How long does it take for container pumpkins to mature?
Most container-friendly pumpkins mature in 75–90 days from seed, depending on the variety. Start seeds indoors 2–3 weeks before your last frost date or sow directly into containers after soil warms to 60°F+. Check seed packets for exact days-to-maturity!
Why aren’t my container pumpkins flowering?
Lack of blooms often means insufficient sunlight (6+ hours/day), poor pollination, or overcrowding. Hand-pollinate with a paintbrush if bees are scarce, and prune excess vines to focus energy. Fertilize lightly with a balanced 10-10-10 mix every 3–4 weeks to boost growth.
Can I grow pumpkins in containers in hot climates?
Yes! But heat stress can stunt growth. Use light-colored containers to reflect sunlight, mulch with straw, and water deeply early in the morning. Choose heat-tolerant varieties like Small Sugar or Waltham Butternut. Shade cloth (30–50%) can help during peak afternoons.
What can I plant alongside pumpkins in a container?
Pumpkins thrive with companion plants like nasturtiums (pest deterrent), bush beans (nitrogen-fixers), or marigolds (fungus control). Avoid potatoes or squash—they compete for space and nutrients. Stick to shallow-rooted, fast-growing pals to maximize container real estate.
How do I protect container pumpkins from frost?
Move containers to a sheltered spot (like a garage or under a porch) when temps drop below 50°F. Cover plants with frost cloth or blankets at night. If frost hits, harvest immature pumpkins—they’ll ripen indoors in a sunny, dry spot (like a pantry).
Wrapping up and next steps
Growing container garden pumpkins proves that big harvests don’t need big space—just a little creativity and care! With the right 5-gallon container, nutrient-rich soil, and consistent sunlight, you’ll enjoy homegrown pumpkins in just 90 days.
Whether you’re a beginner or a seasoned gardener, this method makes it easy to turn your balcony or patio into a thriving mini-farm.
Ready to plant your seeds? Start by gathering your supplies, then follow the steps to nurture your pumpkins from sprouts to harvest. Happy growing! 🌱🎃