
Tools
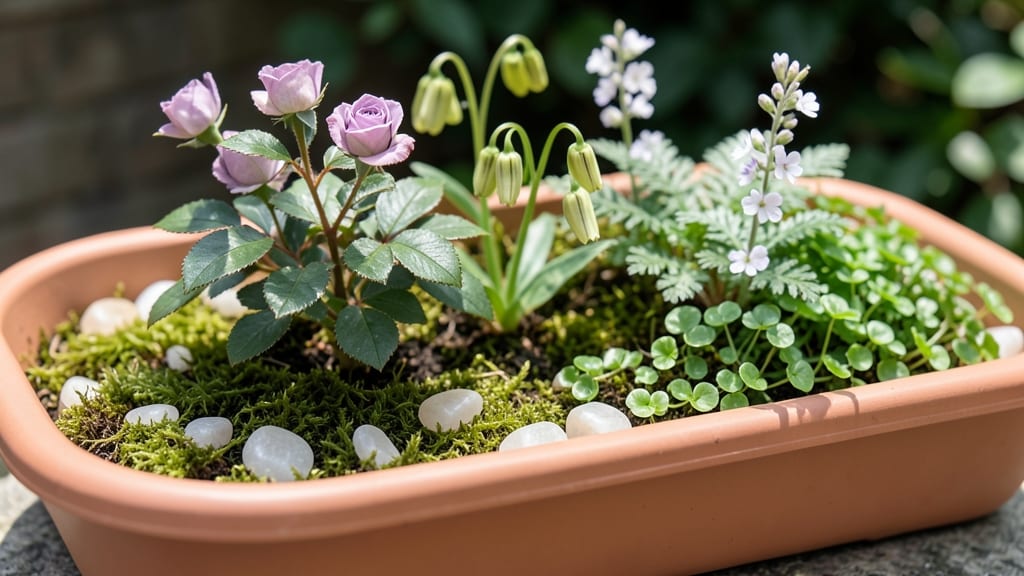
Fairy garden seeds turn empty corners into magical worlds where tiny blooms and mossy paths invite fairies to visit. ✨ I still remember the first time I scattered sweet alyssum and miniature snapdragons—suddenly, my patio table felt like a secret forest clearing.
The key isn’t just planting small; it’s creating a scene where every detail feels intentional, from the pebbled pathways to the toadstools tucked between plants.
You’ll need shallow containers (terracotta pots, wine barrels, or even repurposed teacups), well-draining soil mix, and seeds labeled for fairy gardens—think dwarf violas, baby’s breath, or creeping thyme. Most fairy plants thrive in 4-6 inches of soil depth, so avoid deep pots that waste space.
Add decorative elements like miniature fences, tiny lanterns, or even colored sand to define paths—it’s the finishing touches that make the magic real.
By late spring, you’ll have a lush, fragrant landscape where every bloom is big enough to see but small enough to feel like a fairy’s handiwork. The best part? These gardens stay enchanting year-round with seasonal swaps—swap summer flowers for winter-hardy mosses or tiny evergreens when frost arrives.
Even a 6-inch-wide pot can become a cozy fairy cottage with the right plants and imagination.
Fairy gardens work in sun or shade, on balconies or windowsills—just match plants to light conditions. Start small (a 1-gallon container is perfect for beginners), and let your creativity run wild.
The goal isn’t perfection; it’s creating a space that feels like stepping into a storybook. Ready to make your own miniature wonderland?
📚 In This Guide
- What you need
- Instructions
- Tips and common mistakes
- Wrapping up and next steps
What you need
- ● Fairy Garden Seeds: Choose a mix of fast-growing, low-maintenance varieties like cosmos, marigolds, nasturtiums, or sunflowers (packets of 10-50 seeds each). Opt for heirloom or non-GMO seeds for the most whimsical results!
- ● Containers: Small pots (3-4 inches deep) or window boxes (for elevated gardens).
- ● Miniature garden beds (6-12 inches wide) or upcycled containers (teacups, tin cans, or hollowed-out logs).
- ● Potting Soil: Lightweight, well-draining seed-starting mix (avoid garden soil—it’s too dense!). A 5-10 quart bag is ideal for beginners.
- ● Watering Can or Spray Bottle: A fine-mist sprayer (8-16 oz) keeps seeds from washing away.
- ● Trowel or Small Spoon: For gentle soil handling—avoid digging too deep!
- ○ Gloves (Optional but Helpful): Protect your hands from dirt and tiny seeds.
- ● Decorative Elements: Miniature pebbles, moss, or fairy door kits to set the scene.
- ● Fertilizer: A balanced, water-soluble fertilizer (5-10-5 ratio) for a nutrient boost.
- ● Grow Lights: LED full-spectrum bulbs (if natural light is limited).
- ● Labels: Toiletpaper rolls or miniature chalkboard tags to track plant names.
- ● Fairy Dust (Metaphorically!): A light-colored spray paint for whimsical accents on rocks or containers.
Step-by-Step instructions for growing fairy garden seeds
Transform your miniature world with these delicate blooms—here's how to coax life from tiny seeds.
🌱 Step 1: Prepare Containers and Seed Starting Mix
Choose shallow containers like 4-inch-wide terra cotta pots or repurposed teacups with drainage holes punched in the base. Fairy gardens thrive in well-draining soil, so mix 3 parts potting mix with 1 part perlite to create a light, airy medium. Fill containers to within ½ inch of the rim—this prevents overflow when watering.
Press the mix down gently with your fingers until it's firm but not compacted. The surface should feel like a packed snowball when squeezed—this ensures roots can anchor while allowing excess moisture to escape. I like to sprinkle a thin layer of orchid bark on top before planting; it mimics natural forest floors and helps retain moisture without suffocating delicate seedlings.
💧 Step 2: Sow Seeds at the Perfect Depth
Fairy garden seeds are often tiny, so I use the tip of a toothpick to create ¼-inch-deep dimples in the soil. Place 2-3 seeds per container—these whimsical blooms grow slowly, and thinning later can disturb their fragile roots. Cover seeds with a light dusting of soil, just enough to obscure them from view.
Mist the soil surface with a spray bottle until evenly damp, but avoid creating puddles. You'll know moisture is perfect when the soil looks dark and velvety, not glistening. Place containers in a warm, bright location (around 65-70°F) and cover with a clear plastic dome or plastic wrap to retain humidity. Check daily for condensation—wipe the cover with a damp cloth to prevent mold.
☀️ Step 3: Provide Gentle Light and Monitor Growth
Once seedlings emerge (usually within 10-21 days), remove the cover immediately to prevent leggy growth. Position containers near a south-facing window or under a grow light for 12-14 hours daily. Fairy garden plants like miniature roses and dwarf lilacs need bright but indirect light—direct sun can scorch their tender leaves.
Rotate containers quarter-turn daily so seedlings grow straight rather than leaning toward the light. You'll notice the first true leaves (not the initial seed leaves) appear in 3-4 weeks. At this stage, fertilize lightly with a half-strength liquid fertilizer to encourage sturdy growth without burning delicate roots.
🪴 Step 4: Transplant to Fairy Garden Beds
When seedlings reach 2-3 inches tall with 4-5 true leaves, gently transplant them into your miniature landscape. Dig small holes just slightly larger than the root ball, place seedlings in, and firm soil around the base. Water thoroughly to settle the soil and encourage root contact.
Mulch the surface with fine gravel or moss to mimic natural fairy garden conditions and retain moisture. Avoid overwatering—fairy garden plants prefer slightly dry soil between waterings. You'll see new growth within 1-2 weeks, signaling your tiny blooms have successfully taken root in their enchanted home.
✂️ Step 5: Prune and Maintain for Continuous Blooms
Deadhead spent blooms immediately to encourage more flowers. Use tiny pruning shears to snip just above a set of leaves, and I always save the cuttings in a small jar of water to propagate new plants. Fairy garden plants often bloom in cycles, so I fertilize lightly every 4-6 weeks during the growing season to sustain their delicate growth.
Watch for pests like aphids or spider mites—fairy garden plants are especially vulnerable due to their size. Spray with a neem oil solution at the first sign of trouble, and always test on one plant first to avoid leaf burn. With proper care, your miniature blooms will reward you with year-round color in your fairy garden sanctuary.
Tips & tricks for growing whimsical fairy garden blooms
Fairy garden seeds demand patience and precision—here are the secrets to nurturing them into thriving miniature masterpieces.
The Soil Texture Secret: When mixing your 3 parts potting mix with 1 part perlite, sift the potting mix first to eliminate clumps. This ensures your light, airy medium stays fluffy rather than compacted, which is crucial for tiny roots that need maximum oxygen. In Step 1, press the mix gently until it holds shape like a packed snowball—this creates the perfect balance of stability and drainage for those delicate seedlings.
Seed Placement Precision: In Step 2, those ¼-inch-deep dimples should be just deep enough to obscure the seeds completely. I've found using the tip of a toothpick works best—it gives you the perfect control to place each seed without crushing it. The 2-3 seeds per container recommendation isn't arbitrary; it accounts for germination rates while preventing overcrowding that could stunt growth.
Lighting Strategy: The 12-14 hours of daily light in Step 3 is non-negotiable for fairy garden plants. If you're using a grow light, position it 6 inches above the seedlings and adjust the height as they grow. For south-facing windows, rotate containers quarter-turn daily to prevent leaning—this simple habit makes all the difference in creating straight, sturdy stems that can support those tiny blooms.
Transplanting Timing: Wait until seedlings reach exactly 2-3 inches tall with 4-5 true leaves before transplanting in Step 4. This maturity level ensures they have strong enough root systems to handle the transplant shock. When firming soil around the base, do it gently but firmly—think of giving the plant a gentle handshake rather than a bear hug.
Pro Tips for Fairy Garden Seeds
- Fairy garden seeds demand patience and precision—here are the secrets to nurturing them into thriving miniature masterpieces.
- The Soil Texture Secret: When mixing your 3 parts potting mix with 1 part perlite, sift the potting mix first to eliminate clumps.
- Seed Placement Precision: In Step 2, those ¼-inch-deep dimples should be just deep enough to obscure the seeds completely.
Frequently asked questions
Got questions about bringing your fairy garden to life with tiny seeds? We’ve got answers! Here are some of the most common queries—plus quick tips to help you grow a magical miniature world with confidence.
What’s the best time of year to plant fairy garden seeds?
Most fairy garden seeds thrive when planted in early spring (after the last frost) or late summer (for fall blooms). Check your seed packets for specific timing—cool-season plants (like pansies) love spring, while sun-loving flowers (like nasturtiums) prefer warm soil. Pro tip: Start indoors 4-6 weeks before transplanting to give delicate seedlings a head start!
How often should I water fairy garden seeds?
Keep soil consistently moist (not soggy!) by watering gently every 1-2 days until sprouts appear. Once seedlings emerge, reduce to every 2-3 days or when the top inch of soil feels dry. Use a spray bottle or watering can with a fine rose to avoid disturbing tiny plants. Troubleshooting: Yellowing leaves? You’re overwatering—let the soil dry slightly between sessions.
Can I use regular garden seeds for a fairy garden?
While miniature-specific seeds (like tiny roses or dwarf sunflowers) are fun, many regular flowers and herbs work beautifully—just choose compact varieties. Avoid fast-spreading plants (like mint) or overly tall blooms (e.g., sunflowers) that’ll tower over your fairies. Top picks: Alyssum, thyme, and dwarf zinnias stay petite and charming.
How do I protect fairy garden seeds from pests?
Tiny seeds are tasty treats for bugs! Prevent pests with these tricks:
- Sprinkle diatomaceous earth (food-grade) around seedlings—it’s harmless to plants but deters crawlies.
- Use row covers or mesh until plants are established.
- Plant pest-repelling companions like marigolds or lavender nearby.
What if my fairy garden seeds don’t sprout?
Don’t panic! Try these fixes:
- Check moisture: Seeds need consistent dampness—press a finger into the soil to test.
- Verify depth: Most seeds should be 2x their width below soil (e.g., tiny flowers = ¼ inch deep).
- Test germination: Place a damp paper towel with seeds in a baggie—if they don’t sprout in 1-2 weeks, they may be old or damaged.
- Try a heat mat: Some seeds (like snapdragons) need warmth (70–80°F) to germinate.
Wrapping up and next steps
Creating a fairy garden with tiny, magical seeds is a delightful way to bring enchantment to your outdoor—or indoor—space! Whether you’re a seasoned gardener or just starting, these miniature blooms offer endless creativity and joy. The key is to start small, dream big, and let your imagination guide you.
Ready to turn your vision into reality? Grab your fairy garden seeds, gather your tools, and begin planting today! Share your whimsical creations with fellow gardeners or even host a mini fairy garden party—the magic is just beginning! 🌿✨