Container Gardens
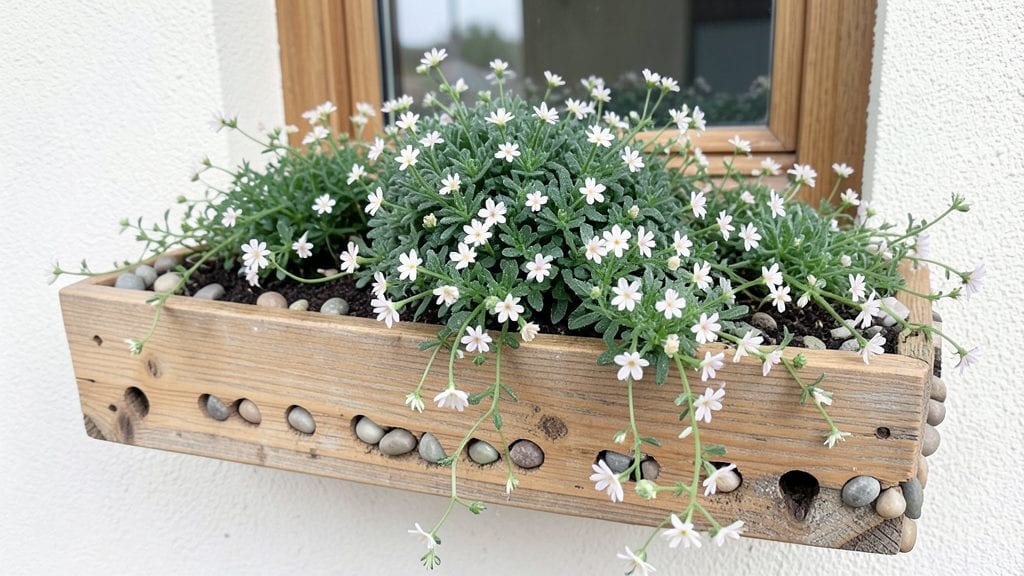
My window box gardening setup transformed my boring apartment balcony into a year-round splash of color—without the fuss of a full garden. 🌿 The secret lies in pairing plants that thrive together, need the same care, and spill over the edges just enough to look effortless.
I learned this the hard way after my first box turned into a sad, wilted mess from poor drainage and overcrowding.
You’ll need a sturdy box with drainage holes, lightweight potting mix, and plants that match your light conditions—sun-lovers like petunias or trailing nasturtiums for sunny spots, and shade-tolerant ferns or ivy for darker corners.
Spacing matters too: give trailing plants room to cascade without blocking sunlight for others. Most boxes stay vibrant for months with just weekly watering and a little pruning.
The payoff is instant: bright blooms in spring, fragrant herbs all summer, and evergreen foliage through winter. My favorite combo is sweet alyssum (for texture), trailing lobelia (for color), and thyme (for scent and edible bonus).
The best part? You can swap out plants by season without replanting the whole box.
Works for any window—sunny, shady, or in-between—whether you’re in a city apartment or a cozy cottage. Let’s get those boxes blooming!
📚 In This Guide
- What you need
- Instructions
- Tips and common mistakes
- Wrapping up and next steps
What you need
- ● Window box: Choose a durable, weather-resistant material like cedar, redwood, or galvanized metal (width: 10–18", depth: 6–12").
- ● Potting soil: 1–2 bags (1–2 cubic feet) of high-quality, well-draining container mix (avoid garden soil—it compacts!).
- ● Drainage: Small rocks (½–1" size) or broken pottery shards (1–2 cups) for the bottom layer.
- ● Plants: 3–5 small plants (trailing, upright, or cascading varieties; see our pairings guide for ideas!).
- ● Watering can: A lightweight, narrow-spout can (1–2 gallons) for precision.
- ● Gloves: Gardening gloves to protect your hands.
- ● Trowel: A small hand trowel for planting and soil adjustments.
- ● Scissors: Pruning shears (for trimming dead foliage).
- ○ Optional: Slow-release fertilizer (granules or spikes).
- ● Mulch (shredded bark or coconut coir) to retain moisture.
- ● Decorative accents (pebbles, moss, or solar lights for ambiance).
- ● A sunny or partially shaded spot near a window (4+ hours of light daily for most plants).
- ● Access to water (a nearby sink or hose).
- ● Basic knowledge of your plants’ watering needs (some thrive with daily checks, others need less!).
Step-by-Step guide to creating year-round window box gardens
Here’s how to transform any windowsill into a vibrant, low-maintenance display—no green thumb required.
🪴 Step 1: Select the Right Box and Prepare the Base
Start with a window box that has drainage holes—this is non-negotiable. If yours doesn’t, drill ¼-inch holes along the bottom and sides. Line the box with landscape fabric to prevent soil from washing out while still allowing water to drain freely. This keeps roots healthy and stops soil from clogging the holes over time.
Next, add a 1-inch layer of gravel or small stones at the bottom. This creates a reservoir for excess water, preventing soggy roots. Press it down lightly so it stays in place when you add soil later. I like to use pebbles because they’re lightweight and easy to work with.
🌱 Step 2: Fill With Lightweight, Well-Draining Soil
Use 4-6 gallons of high-quality potting mix—never garden soil, as it compacts and suffocates roots. Mix in 1 cup of perlite or coarse sand per gallon to improve drainage. This combo ensures water flows through easily while still holding enough moisture for delicate roots.
Fill the box ¾ full with your soil mix, leaving room for plants and mulch. Press down gently to settle the soil, but don’t compact it too tightly. You want it fluffy enough for roots to spread comfortably. Tap the box lightly on the table to even out the surface before planting.
☀️ Step 3: Choose and Plant Low-Maintenance Pairings
For year-round color, I recommend 4-6 plants per box—mix two flowering annuals (like petunias or pansies) with two foliage plants (like sweet potato vine or heuchera). Annuals provide bursts of color, while foliage plants fill gaps and add texture. Space them 4-6 inches apart to allow airflow and prevent crowding.
Dig holes twice as deep as the root ball and gently tease the roots apart if they’re circling. Place each plant so the top of the root ball sits ½ inch below the soil line—this helps stabilize them. Water immediately after planting to settle the soil around the roots and remove any air pockets.
💧 Step 4: Water and Mulch for Long-Lasting Beauty
Water thoroughly until it drains from the bottom holes, then let excess water run out completely. This ensures roots get a deep drink without sitting in water. After planting, add a ½-inch layer of mulch (like shredded bark or pebbles) to retain moisture and suppress weeds. Mulch also keeps soil temperatures steady, which is crucial for delicate window box plants.
Check moisture daily—window boxes dry out faster than ground-level planters because of airflow. Water when the top inch of soil feels dry, but avoid soggy soil. A spray bottle works well for gentle watering without disturbing the plants.
⏰ Step 5: Rotate and Refresh Seasonally
Swap out plants every 3-4 months to keep your window box fresh. In spring, plant pansies or violas for cool weather, then transition to geraniums or lobelia as temperatures rise. For fall and winter, opt for heuchera or dusty miller—they thrive in cooler months and add structure.
Rotate the box every 2 weeks so all sides get even sunlight. This prevents plants from leaning toward the light and keeps growth balanced. Prune spent blooms regularly to encourage more flowers and maintain a neat appearance. With this simple rotation, your window box stays vibrant all year with minimal effort.
Tips & tricks for perfect window box gardens
Between us, creating a thriving window box isn't rocket science—but there are a few tricks that'll make your year-round display look like it came straight from a nursery. Here's what nobody tells you about keeping those plants happy and healthy.
Drainage is Everything: In Step 1, that 1-inch layer of gravel isn't just decoration—it's your secret weapon against root rot. I've seen too many window boxes fail because people skipped this. Use rounded pebbles instead of sharp gravel to prevent tiny root tears when you add soil later. Pro tip: If your box has no drainage holes, consider using a lightweight plastic liner with holes cut to match the gravel layer—it'll catch any soil that might escape while still allowing water to drain.
Soil Science Matters: When mixing your 4-6 gallons of potting soil in Step 2, don't skimp on the perlite or sand. I like to use a 70/30 ratio of potting mix to perlite for containers this small—it gives you that perfect balance of moisture retention and airflow. For extra insurance, add a handful of worm castings to the mix. They won't change the texture but will give your plants a nutrient boost right from the start. The fluffy soil you create here is what lets those delicate roots breathe properly.
Plant Placement Psychology: In Step 3, when arranging your 4-6 plants, think about height and color. Place taller plants toward the back (the side closest to the window) and shorter ones toward the front. I like to put my sweet potato vine in the center—it'll cascade beautifully over the sides while providing a green backdrop for the more colorful annuals. And here's a trick: mix in one plant with variegated foliage (like a silver-leaved plant) to make your whole display pop against the window background.
Watering Wisdom: That daily moisture check in Step 4 is crucial, but don't rely solely on your finger. I keep a small moisture meter handy for my window boxes—it tells me exactly when the top inch is dry. For extra-efficient watering, try the "bottom watering" method: Place your window box in a shallow tray of water for 10-15 minutes. The water will wick up through the drainage holes, giving roots a thorough drink without disturbing the plants. This works especially well if you're away for a few days and want to give your plants a good soak.
Pro Tips for Window Box Gardening
- Between us, creating a thriving window box isn't rocket science—but there are a few tricks that'll make your year-round display look like it came straight from a nursery.
- Drainage is Everything: In Step 1, that 1-inch layer of gravel isn't just decoration—it's your secret weapon against root rot.
- Soil Science Matters: When mixing your 4-6 gallons of potting soil in Step 2, don't skimp on the perlite or sand.
Frequently asked questions
Got questions about window box gardening?
You’re not alone! Here are answers to the most common queries to help you grow confidently—no green thumb required.
What’s the best soil mix for window box gardens?
Use a lightweight, well-draining potting mix blended with perlite or sand (20% by volume) to prevent waterlogging. Avoid garden soil—it compacts and suffocates roots. For herbs or veggies, add compost for nutrients. Pro tip: Test drainage by soaking a handful; water should drain within 5 minutes.
When is the ideal time to plant a window box?
Plant in spring (after last frost) or early fall for best results. Containers warm up faster, so avoid winter planting unless using cold-hardy plants (like pansies or winter alyssum) in mild climates. For year-round blooms, stagger plantings every 6–8 weeks.
How often should I water a window box?
Check soil moisture daily—top 1–2 inches should dry out between waterings. Morning watering prevents evaporation, and drip irrigation (or a self-watering box) cuts maintenance. Warning: Overwatering is the #1 killer. Adjust frequency based on sun exposure (more water = more sun).
How do I keep pests out of my window box?
Prevent pests with neem oil or insecticidal soap, and choose pest-resistant plants (e.g., marigolds deter aphids). Ensure good airflow, remove fallen leaves, and inspect new plants before adding them. For slugs, use copper tape around the box’s edge.
Can I use a window box on a balcony without direct sunlight?
Yes! Opt for shade-tolerant plants like ferns, impatiens, or ivy. Place the box near a window with indirect light (e.g., east-facing) and use grow lights (12–14 hours/day) if needed. Avoid heavy feeders like tomatoes—they’ll struggle.
Wrapping up and next steps
Window box gardening is your ticket to vibrant, low-maintenance beauty—no green thumb required! 🌸 With the right plant pairings and a few simple tools, you can transform any windowsill into a thriving display that brightens your space and your spirit.
Whether you’re a beginner or a seasoned gardener, the key is confidence and creativity—start small, experiment, and enjoy the process!
Ready to dive in? Pick your favorite combo, grab your supplies, and let your window boxes bloom with year-round color. What’s the first plant you’ll add to your collection? 🌿