Container Gardens
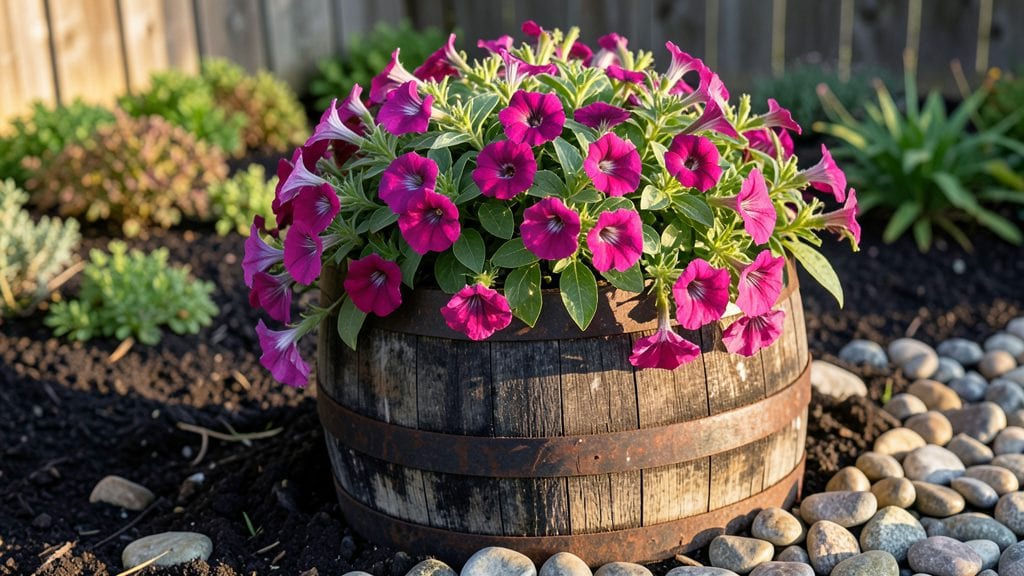
Turn an old wine barrel into a thriving garden that steals the show. ✨ I was skeptical too—until I transformed a weathered barrel into a vertical herb garden that now produces more basil than my entire kitchen windowsill.
The rustic charm isn't just decoration; it's a space-saving powerhouse that turns dead corners into lush, productive nooks.
You'll need a clean, food-safe barrel (check for vinegar residue), a drill for drainage holes, and some potting mix designed for containers. The key is balancing aesthetics with function—paint or stain the barrel to match your patio, but leave the top open for easy access.
Herbs, succulents, and compact veggies like cherry tomatoes thrive in the shallow soil, while trailing plants like nasturtiums add cascading color.
Imagine snipping fresh rosemary for roasts or harvesting cherry tomatoes within arm's reach of your outdoor seating. The vertical space keeps plants off the ground, reducing pests while maximizing yield. Plus, the barrel's shape creates a natural focal point that feels intentional, not cluttered.
This project takes under 2 hours to set up and pays dividends in both beauty and harvest.
Works for patios, balconies, or even as a centerpiece in a courtyard. The same principles apply whether you're growing flowers, herbs, or edibles—just adjust the plant choices to your climate and sunlight. Here's how to make it happen without breaking a sweat or your budget.
📚 In This Guide
- What you need
- Instructions
- Tips and common mistakes
- Wrapping up and next steps
What you need
- ● Wine Barrels: 1–3 (standard 30-gallon barrels work best; ensure they’re food-safe and clean).
- ● Drill or Power Saw: For cutting drainage holes (¼"–½" diameter, spaced 6–12" apart).
- ● Sandpaper or Wire Brush: To smooth rough edges and remove residue.
- ● Potting Soil: 1–2 bags of high-quality, well-draining mix (avoid garden soil—it compacts!).
- ● Drainage Material: Gravel, pebbles, or broken pottery (2–3 inches at the barrel’s base).
- ● Plants: Choose compact varieties like herbs (basil, thyme), lettuce, strawberries, or shallow-rooted veggies.
- ● Watering Can or Hose: With a gentle spray nozzle for even hydration.
- ● Barrel Liner: Plastic or fabric (to prevent soil leaks if barrels are porous).
- ● Drip Irrigation Kit: For hands-off watering (great for busy gardeners!).
- ● Paint or Stain: Non-toxic, weather-resistant (to customize your barrel’s look).
- ● Barrel Handles or Legs: For mobility or elevation (DIY with metal brackets!).
- ● Mulch: Straw or wood chips to retain moisture and suppress weeds.
Step-by-Step instructions for building a functional wine barrel garden
Here’s how to transform a wine barrel into a productive, space-saving garden—no special tools required.
🪴 Step 1: Clean and Prepare the Barrel
Start by emptying the barrel completely and rinsing it thoroughly with hot, soapy water to remove any residue. Stubborn stains? A stiff brush and vinegar solution (1:1 ratio) will cut through years of buildup. Once clean, let it dry completely in the sun—this prevents mold and ensures a fresh start for your plants.
Remove the metal hoops and inspect the staves for cracks or splits. If you find any, seal them with waterproof wood glue or silicone caulk designed for outdoor use. This step is critical—leaks will rot the wood and drown your plants. Sand any rough edges to prevent splinters, then give the barrel a final wipe-down with rubbing alcohol to sterilize the surface.
🌱 Step 2: Add Drainage and Soil
Drill ¼-inch holes along the bottom of the barrel in a staggered pattern—this ensures excess water escapes without washing away soil. Space them 4-6 inches apart to balance drainage and stability. Line the bottom with landscape fabric to filter out debris while allowing water to pass through freely.
Fill the barrel with 6-8 inches of coarse gravel (like pea gravel) to improve drainage further. Then, add 2-3 inches of perlite or pumice on top—this prevents soil compaction and helps roots breathe. Finally, fill the remaining space with high-quality potting mix mixed with compost (a 3:1 ratio works well). Press it down lightly but don’t compact it too tightly—roots need room to grow.
☀️ Step 3: Plant and Arrange Your Garden
Choose plants that thrive in containers, like herbs, strawberries, or shallow-rooted vegetables—they’ll love the barrel’s depth and drainage. Dig small holes just large enough to accommodate the root balls, then place each plant 2-3 inches deeper than it grew in its original pot. This encourages stronger root development.
Arrange plants strategically: place sun-loving varieties (like tomatoes or peppers) on the south-facing side of the barrel, while shade-tolerant plants (like lettuce or parsley) can go on the north side. Fill gaps with annual flowers to attract pollinators and add color. Water thoroughly after planting to settle the soil around the roots—you’ll see a slight sink as the mix compresses slightly.
💧 Step 4: Water and Maintain
Water deeply every 2-3 days until the top 2 inches of soil feel dry to the touch. Wine barrels dry out faster than traditional planters, so check moisture regularly—especially in hot weather. Mulch the surface with 2-3 inches of straw or wood chips to retain moisture and suppress weeds. Avoid synthetic mulches; they can trap too much heat and harm delicate roots.
Fertilize lightly every 4-6 weeks with a balanced, slow-release fertilizer (like 10-10-10) to keep plants thriving without overloading the soil. If you notice leaves yellowing or growth slowing, it’s a sign of nutrient deficiency—adjust your feeding schedule or switch to an organic option like fish emulsion. Rotate the barrel occasionally to ensure even sun exposure, preventing plants from leaning toward the light.
✂️ Step 5: Prune and Harvest
Regular pruning keeps your wine barrel garden productive and tidy. Pinch back overgrown stems to encourage bushier growth, and remove yellowed or diseased leaves immediately to prevent spread. For herbs like basil or mint, harvest leaves in the morning by snipping just above a set of leaves—this stimulates new growth and keeps the plant lush.
When harvesting fruits or vegetables, pick them at peak ripeness to encourage more production. For example, strawberries should be bright red and slightly soft to the touch, while tomatoes should yield gently when held. After harvest, give the plants a light watering and a quick check for pests—early intervention saves your garden from infestations.
Tips & tricks for perfect wine barrel garden setup
Transforming a wine barrel into a thriving garden takes more than just filling it with soil—it’s about creating an ecosystem that maximizes space and nurtures growth. Here’s what I’ve learned after repurposing barrels myself.
Drainage is Everything: In Step 2, those ¼-inch holes might seem small, but they’re crucial for preventing soggy roots. I’ve seen barrels leak from improperly spaced holes—space them 4-6 inches apart in a staggered pattern to ensure even water distribution. Use a drill bit slightly smaller than ¼-inch to avoid enlarging holes over time, and always test drainage by filling the barrel with water before adding soil. This simple check saves you from waterlogged plants down the road.
Soil Science Matters: The 3:1 ratio of potting mix to compost in Step 2 isn’t just arbitrary—it’s about balance. Too much compost can lead to nutrient burn, while too little potting mix reduces aeration. I recommend mixing in worm castings (optional but game-changing) to boost microbial activity without altering the ratio. Press the soil lightly but don’t compact it; think of it like fluffing a pillow—just enough to hold shape but still breathable.
Plant Placement Strategy: When arranging your garden in Step 3, think vertically as well as horizontally. Tall plants like tomatoes or peppers should go on the outer edges of the barrel’s curve, while shorter herbs and lettuce can nestle in the center. This creates a natural windbreak and prevents taller plants from shading their neighbors. For extra stability, tuck trailing plants like nasturtiums along the barrel’s sides—they’ll cascade beautifully while adding pollinator appeal.
Watering Wisdom: The 2-3 day watering schedule in Step 4 works best when you check moisture at the top 2 inches of soil. Use a moisture meter or your finger—if it feels dry, water until it runs out the drainage holes. I’ve found that wine barrels dry out faster than traditional planters, so during heatwaves, I water every 1-2 days instead. Mulching with 2-3 inches of straw helps retain moisture, but avoid piling it against plant stems to prevent rot.
Pro Tips for Wine Barrel Garden
- Transforming a wine barrel into a thriving garden takes more than just filling it with soil—it’s about creating an ec...
- Drainage is Everything: In Step 2, those ¼-inch holes might seem small, but they’re crucial for preventing soggy root...
- Soil Science Matters: The 3:1 ratio of potting mix to compost in Step 2 isn’t just arbitrary—it’s about balance. Too ...
Frequently asked questions
Got questions about turning a wine barrel into a thriving garden? Here are some of the most common ones—and their answers!
Can I use any wine barrel for gardening?
Not all barrels work! Look for food-grade barrels made from oak or cedar—avoid treated or painted ones. Stainless steel barrels are also a great alternative. Always check for leaks or damage before repurposing. Pro tip: A barrel’s size (usually 30-60 gallons) determines what you can grow—bush tomatoes thrive, but vines like cucumbers may need support!
How long does it take for a wine barrel garden to be ready for planting?
Prep time varies! If your barrel is clean and dry, you can plant within a few days. If it’s new or needs conditioning (like removing wine residue), allow 1-2 weeks for drainage holes, lining (if needed), and soil prep. For faster results, use a high-quality potting mix with compost to jumpstart growth.
Are wine barrel gardens more expensive than regular containers?
Costs depend on the barrel’s condition and materials. A used oak barrel can be free or cheap (check local wineries or Facebook Marketplace), while stainless steel runs $50–$150. Compare this to buying multiple large pots—barrels often save money while adding rustic charm! Repurpose old barrels to cut costs further.
What if my barrel garden isn’t draining well?
Poor drainage is common but fixable! Ensure the barrel has 3–5 drainage holes (drill them if needed) and add a layer of gravel or broken pottery at the bottom. If water still pools, consider lining the barrel with landscape fabric before adding soil. Overwatering is the real culprit—let soil dry between waterings!
Can I grow vegetables in a wine barrel year-round?
It depends on your climate! Barrels excel in warm seasons but may need insulation (like burlap or a frost blanket) in winter. In cold regions, move potted plants indoors or use a greenhouse. Herbs and leafy greens (like lettuce) adapt better to cooler temps than heat-loving veggies like peppers.
Wrapping up and next steps
A wine barrel garden isn’t just a creative way to grow plants—it’s a stylish, space-saving solution that brings rustic charm to any outdoor (or indoor!) space. 🌱 Whether you’re a seasoned gardener or just starting out, repurposing barrels transforms discarded materials into thriving green oases while adding character to your home.
Ready to raise your garden game? Start small—pick a barrel, gather your supplies, and let your green thumb shine! For even more inspiration, explore DIY container garden ideas or share your progress with fellow plant lovers online. Your next harvest (or Instagram-worthy shot) is just a barrel away! 🍷🌿