Blooming
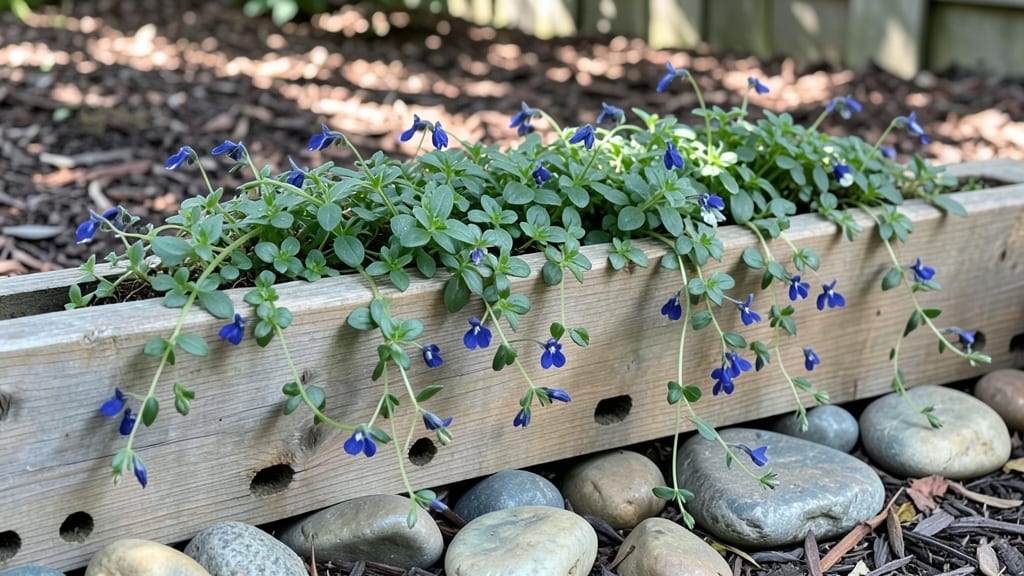
Long garden planters turned my narrow backyard into a lush, productive paradise—where every inch of space grows something beautiful. 🌿 The key isn’t just stacking plants vertically; it’s choosing the right materials, arranging them for airflow and aesthetics, and picking varieties that thrive when their roots share a home.
My first attempt with cheap plastic planters failed after two seasons, but switching to cedar with built-in drainage changed everything.
You’ll need planters at least 24 inches long (longer is better for root systems), sturdy supports if hanging, and a mix of plants that complement each other in height, color, and care needs.
Succulents, trailing petunias, and compact herbs work beautifully together—just avoid pairing water-lovers with drought-tolerant types. The right combo keeps maintenance simple while maximizing visual impact, even in tight spaces.
By summer’s end, you’ll have a thriving vertical garden that’s easier to reach than raised beds and far more decorative. Imagine morning glories climbing alongside snapdragons, their blooms spilling over the edges like a waterfall.
The best part? You can customize planters with reclaimed wood, metal troughs, or even repurposed pallets—no two setups need to look the same.
Perfect for balconies, side yards, or urban courtyards where space is limited but ambition isn’t. Whether you’re growing flowers, veggies, or both, these planters prove that vertical gardening isn’t just creative—it’s practical. Let’s get your space growing upward!
📚 In This Guide
- What you need
- Instructions
- Tips and common mistakes
- Wrapping up and next steps
What you need
- ● Long Planter Container: Length: 4–8 feet (adjust based on space and design)
- ● Width: 6–12 inches (for shallow-rooted plants)
- ● Depth: 8–12 inches (for adequate drainage and root growth)
- ● Options: Wooden crates, repurposed rain gutters, PVC pipes, or store-bought planters.
- ● Drainage Solutions: Drill or pre-drilled holes (if using wood/PVC)
- ● Pebbles or gravel (1–2 inches layer at the bottom)
- ○ Drainage fabric (optional, to prevent soil clogging)
- ● Soil: High-quality potting mix (avoid garden soil—it compacts)
- ● Quantity: ~1 cubic foot per 1–2 feet of planter length
- ● Plants: Spiller plants (e.g., Trailing Lobelia, Sweet Potato Vine)
- ● Filler plants (e.g., Coleus, Petunias)
- ○ Thriller plants (e.g., Dracaena, Snake Plant) – optional for height
- ● Basic Tools: Drill with bits (for drainage holes)
- ● Measuring tape
- ● Screwdriver or nails (if assembling wooden planters)
- ○ Paint/stain + brush (optional, for aesthetics)
- ○ Optional Upgrades: Self-watering reservoir kit (for low-maintenance gardening)
- ● Planters with built-in wheels (for mobility)
- ● Decorative edging or paint (to match your space)
- ● A sunny or partially shaded spot (check plant light needs!)
- ● Access to water (for regular care)
- ● Basic gardening knowledge (or a willingness to learn!)
Step-by-Step guide to designing long garden planters
Transform narrow spaces into lush vertical gardens with these proven techniques.
🪴 Step 1: Choose the Right Planter and Materials
Select a long, narrow planter with a minimum depth of 12 inches to accommodate deep-rooted plants. I prefer cedar or redwood for natural rot resistance and aesthetic appeal, but treated lumber works too. Ensure the planter has drainage holes—no exceptions. If your planter lacks them, drill ½-inch holes every 6 inches along the bottom edge.
Line the bottom with landscape fabric to prevent soil from washing out while allowing water to drain freely. Cut a piece slightly larger than the planter's base and staple it securely. This simple step prevents clogging and keeps roots healthy. I also add a 2-inch layer of gravel on top of the fabric to further improve drainage.
🌱 Step 2: Layer Soil for Optimal Drainage and Aeration
Fill the planter with a custom soil blend that promotes root health. Start with a 3-inch layer of coarse perlite or pumice to create air pockets and prevent compaction. This layer is critical—it mimics the natural aeration of garden soil while preventing waterlogging, which is especially important in long, narrow planters.
Next, add a 6-inch layer of high-quality potting mix. Avoid garden soil—it compacts easily and suffocates roots. Mix in 20% compost to provide nutrients without overwhelming the plants. Moisten the soil lightly before planting; it should feel like a damp sponge, not a soggy mess. Tap the planter gently to settle the layers evenly.
☀️ Step 3: Arrange Plants for Thrive and Visual Harmony
Plan your plant layout using the "thriller-filler-spiller" principle for maximum impact. Place a tall, upright plant like snapdragons or ornamental grasses at the back as your thriller. Add mid-height fillers like salvia or dusty miller in the middle, and trailing plants like petunias or sweet potato vine along the edges to create a cascading effect.
Space plants according to their mature size—typically 6-12 inches apart, depending on the variety. Dig holes slightly larger than the root balls and place each plant at the same depth it grew in its container. Press soil gently around the roots to eliminate air pockets, then water deeply to help roots establish contact with the soil.
💧 Step 4: Water and Maintain for Long-Term Success
Water the planter thoroughly after planting, allowing water to run through the drainage holes. Check moisture daily for the first week—long planters dry out faster than wide ones. Once established, water when the top inch of soil feels dry. I use a drip irrigation system or soaker hose to deliver water evenly without disturbing the soil surface.
Fertilize every 4-6 weeks with a balanced, water-soluble fertilizer diluted to half-strength. Over-fertilizing in planters leads to salt buildup, which damages roots. Mulch the surface with 1-2 inches of shredded bark to retain moisture and suppress weeds. Replace mulch annually or when it breaks down into the soil.
✂️ Step 5: Prune and Rotate for Continuous Growth
Prune leggy or overgrown plants regularly to encourage bushier growth and prevent them from shading smaller companions. Deadhead spent blooms promptly to prolong flowering and redirect energy into new growth. I shear back trailing plants like sweet potato vine every 4-6 weeks to maintain their shape and density.
Rotate the planter a quarter turn every 2 weeks so all plants receive even sunlight exposure. This simple habit prevents plants from leaning toward the light and ensures uniform growth. In late fall, remove annuals and replace them with cold-hardy perennials or winter greens if your climate allows.
Tips & tricks for perfect long garden planters
Here's what I've learned after transforming countless narrow spaces into thriving vertical gardens.
Drainage is Non-Negotiable: In Step 1, when you're drilling those ½-inch holes every 6 inches, space them closer together if your planter is wider than 12 inches. The goal is to prevent waterlogging—especially critical in long planters where water can pool at the far ends. I've seen roots rot from inadequate drainage, and it's a heartbreaking sight. Consider adding a 3-inch layer of expanded clay pebbles instead of gravel for even better aeration.
The Soil Layering Secret: When building your soil layers in Step 2, don't skip the 3-inch perlite/pumice layer—this is where most beginners cut corners. The difference between thriving plants and struggling ones often comes down to this single layer. For extra insurance, mix in 10% coconut coir with your potting mix to improve moisture retention without compacting. Pro tip: Sift your potting mix to remove any large clumps before adding it.
Plant Spacing Precision: In Step 3, when spacing your plants 6-12 inches apart, remember that trailing plants need more room to spread. I've learned the hard way that crowding petunias or sweet potato vine leads to competition for resources. For a 4-foot planter, I typically place my thriller plant at one end, then space fillers 8-10 inches apart, leaving the trailing plants for the edges where they can cascade freely.
Watering Wisdom: The top inch soil dry rule in Step 4 is your golden guideline, but long planters have unique challenges. Water from both ends of the planter to ensure even moisture distribution—especially if you're using a hose. For containers longer than 6 feet, consider installing a soaker hose along both long sides to prevent dry spots. And here's a pro move: Water in the morning so plants have all day to absorb moisture before evening evaporation.
Pro Tips for Long Garden Planters
- Here's what I've learned after transforming countless narrow spaces into thriving vertical gardens.
- Drainage is Non-Negotiable: In Step 1, when you're drilling those ½-inch holes every 6 inches, space them closer together if your planter is wider than 12 inches.
- The Soil Layering Secret: When building your soil layers in Step 2, don't skip the 3-inch perlite/pumice layer—this is where most beginners cut corners.
Frequently asked questions
Got questions about maximizing your space with long garden planters? You’re not alone! Here are answers to common queries to help you grow with confidence.
What’s the best material for long garden planters?
Durability and drainage are key! Resin is lightweight and weather-resistant, while cedar or redwood offer natural beauty and longevity (just seal them for extra protection). For heavy-duty needs, galvanized metal or fiberglass are great. Avoid untreated wood—it rots faster.
When is the ideal time to plant in long garden planters?
Timing depends on your climate! For cool-season crops (lettuce, spinach), plant in early spring or fall. Warm-season plants (tomatoes, peppers) thrive after the last frost (check your USDA zone). Container gardening lets you extend seasons—just use row covers for early/late planting!
Are long planters worth the investment over raised beds?
Absolutely—if space is tight! Planters save floor space and create vertical appeal, but raised beds offer better soil control and deeper roots for large plants. For herbs, flowers, or shallow-rooted veggies, planters shine. Need a hybrid? Try wall-mounted planters or stackable troughs!
How do I keep pests out of my long garden planters?
Prevention is easier than cure! Copper tape deters slugs, neem oil repels aphids, and companion planting (e.g., marigolds with tomatoes) confuses pests. Elevate planters off the ground to reduce burrowing insects. Diatomaceous earth works for crawling critters—just reapply after rain.
Can I reuse long planters year after year?
Yes! Clean them thoroughly after harvest: scrub with soapy water, rinse, and sterilize with a 1:10 bleach-water mix (rinse well!). Store in a dry place to prevent mold. Wood planters may need resealing every few years. With care, they’ll outlast seasonal trends!
Wrapping up and next steps
Transforming small spaces into lush, thriving gardens is easier than ever with long garden planters—they’re your secret weapon for adding vertical beauty without sacrificing square footage! 🌿 Whether you’re a seasoned gardener or a beginner, these planters offer endless creativity, from cascading flowers to fresh herbs, all while boosting curb appeal and air quality.
The key? Start small, experiment with textures and heights, and let your green thumb shine.
Ready to dive in? Measure your space, gather your supplies, and sketch your dream design today! Your future garden oasis awaits—happy planting! 🌱✨